
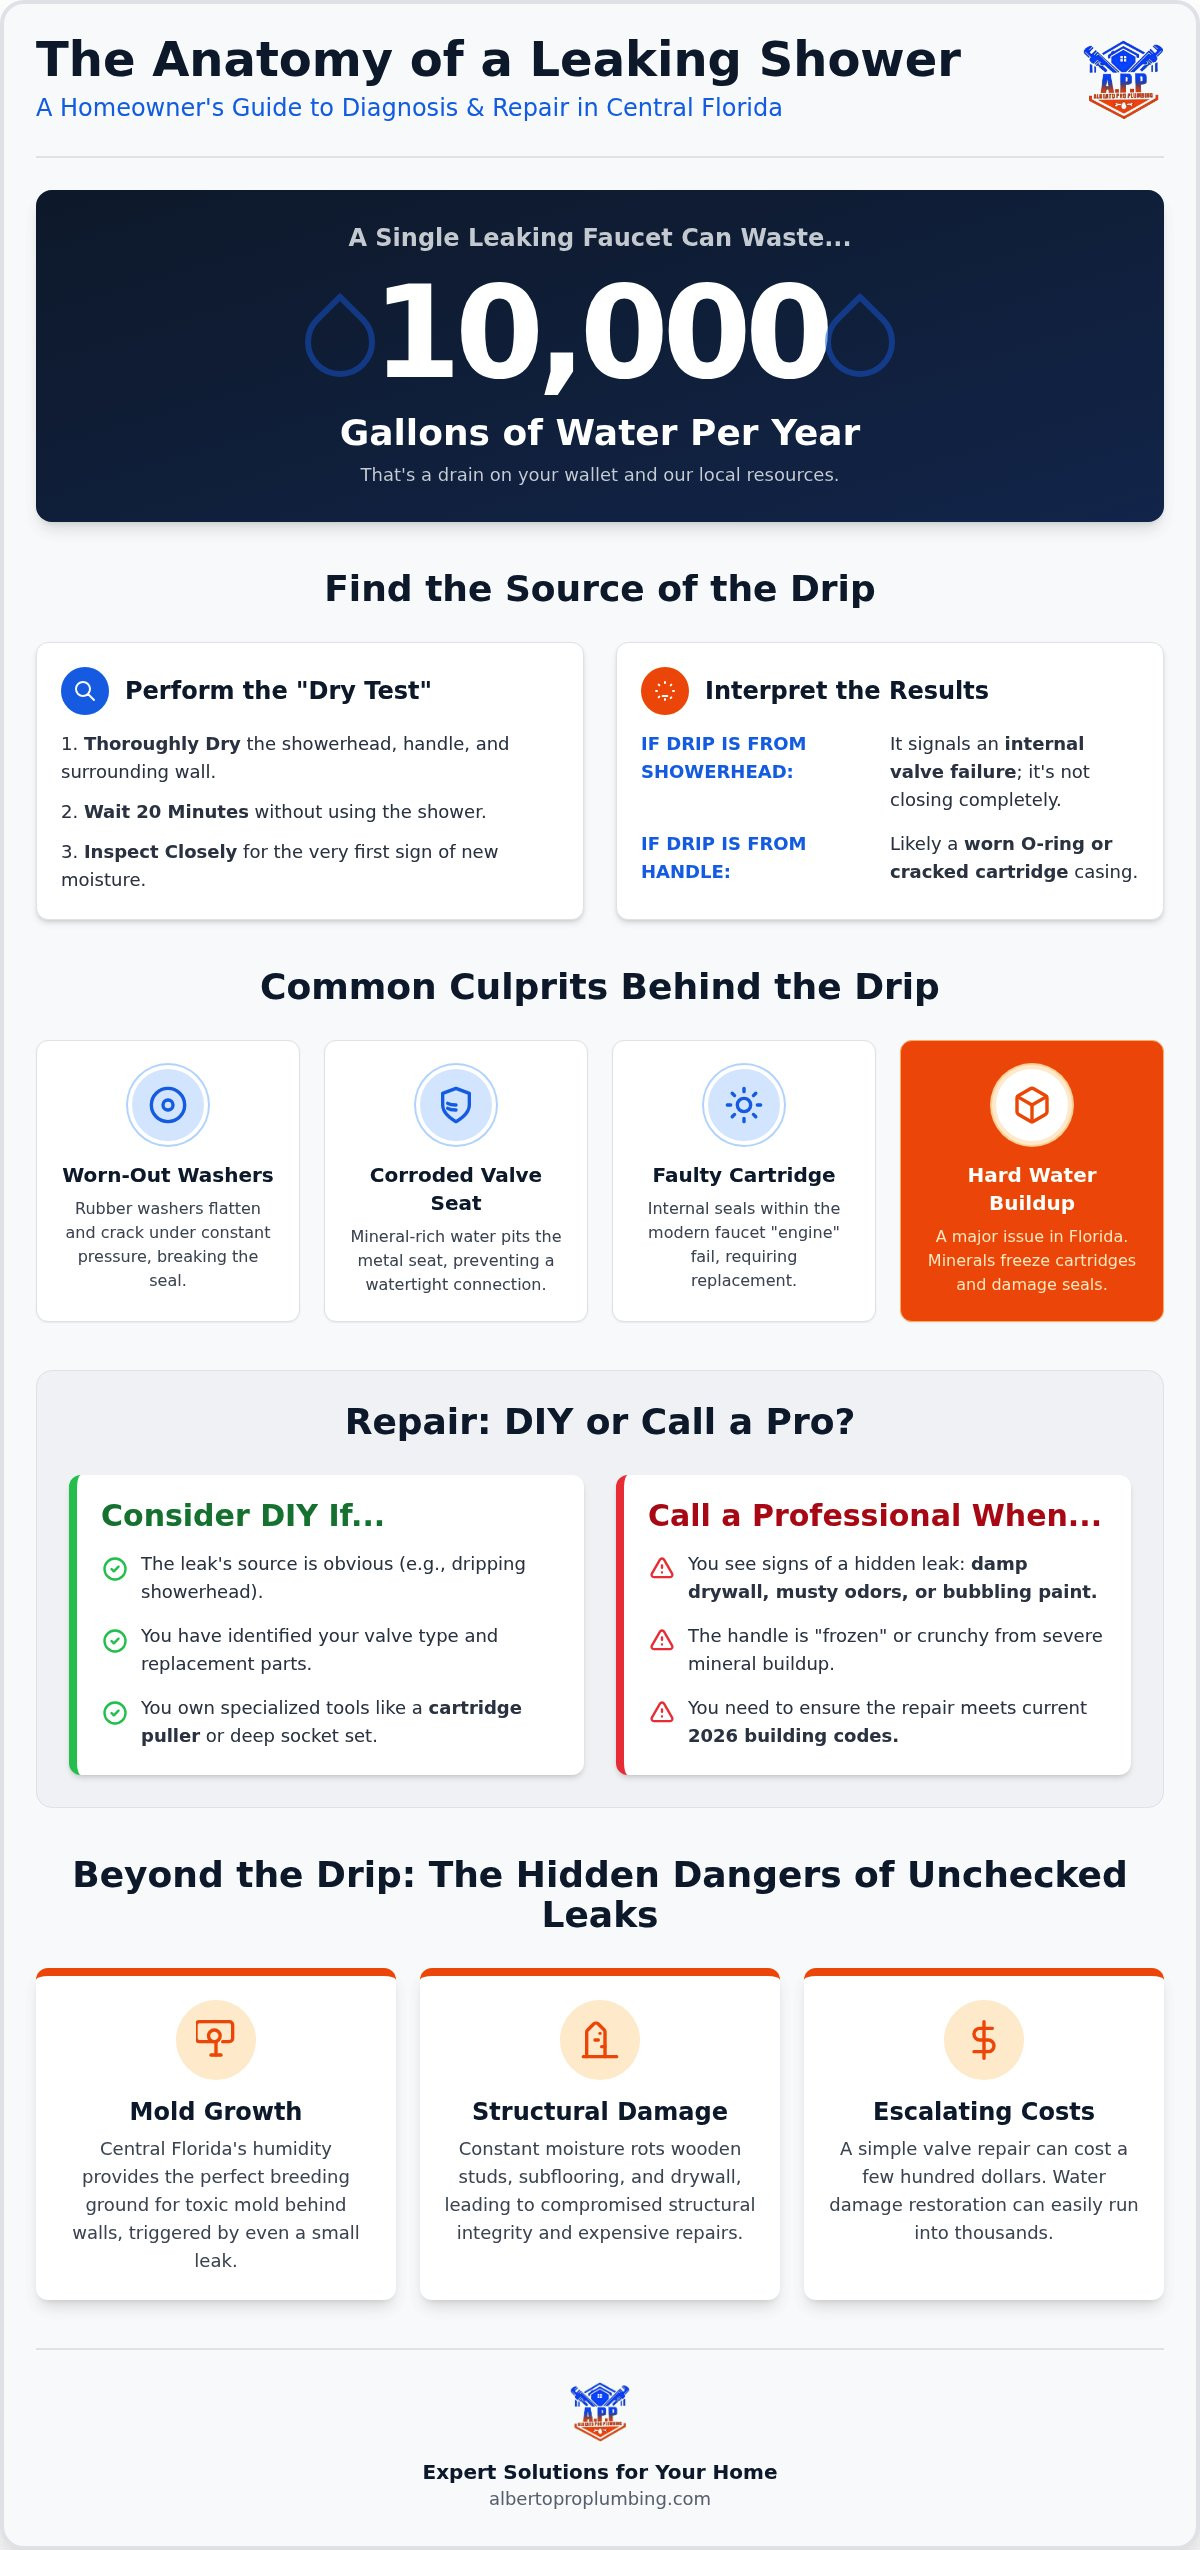
Did you know that a single leaking shower faucet can waste up to 10,000 gallons of water every year? In Central Florida, where our water supply is already under pressure, that constant drip is more than just an annoying sound keeping you awake at night; it is a direct drain on your wallet and our local resources. Many homeowners find themselves staring at a drip, wanting to start a leaking shower faucet repair, but they hesitate for fear of making the damage worse or creating a massive mess in their bathroom.
We understand that a plumbing issue can feel like a crisis, but you don’t have to face it alone. This 2026 guide is designed to give you the technical authority to diagnose the problem and the practical steps to fix it while protecting your home from hidden water damage. We will walk you through the nuances of Florida hard water challenges, explain the latest 2026 building code requirements, and provide a clear roadmap for restoring your shower to peak condition. By the end of this article, you will know exactly how to stop the waste, navigate the repair process, and keep your home running smoothly.
Key Takeaways
- Learn how to use the “Dry Test” to quickly determine if your leak is coming from the showerhead or the internal valve.
- Master the essential steps for a successful leaking shower faucet repair by correctly identifying cartridges and limit stops.
- Assess whether you have the specialized tools, like a cartridge puller or deep socket set, before starting a DIY project.
- Understand how small drips can lead to significant mold growth and structural issues in Central Florida’s humid climate.
- Recognize the signs that a repair requires a professional to ensure your plumbing meets 2026 building codes and your home stays tidy.
Understanding Why Your Shower Faucet Is Leaking
A shower faucet leak occurs when water escapes from the intended path within your plumbing fixture. This might look like a steady drip from the showerhead, water trickling out from behind the handle, or even moisture seeping into the wall cavity. Understanding the difference between a showerhead leak and a valve leak is the first step in a successful leaking shower faucet repair. If the showerhead drips for a few minutes after you turn it off, it is likely just residual water clearing the pipe. However, a constant, 24/7 drip means the valve, which is the “engine” behind the wall, is failing to seal completely.
In Clermont and across Central Florida, most modern homes utilize single-handle pressure-balancing valves. These are sophisticated components designed to maintain a consistent water temperature even if someone elsewhere in the house uses water. Over time, internal components like O-rings, gaskets, and springs degrade. This is often accelerated by our region’s high mineral content. These minerals create abrasive scale that eats away at rubber seals and clogs small internal ports.
Common Causes of Faucet Drips
Several factors contribute to a failing shower faucet. In older Central Florida homes with two-handle systems, the most common culprit is a worn-out rubber washer. These washers are under constant pressure and eventually flatten or crack, allowing water to pass through. Another frequent issue is a corroded valve seat. Long-term exposure to minerals in our local water supply causes the metal seat to become pitted. This prevents a watertight seal even if you install a new washer. For most modern “mixer” faucets, the problem usually lies within a faulty cartridge. These plastic or brass cylinders house the internal seals, and when they fail, the entire unit typically needs replacement to restore function.
Identifying Your Shower Valve Type
Before you head to the hardware store, you must identify what kind of valve is behind your shower handle. Most homeowners will have a cartridge, ball, or ceramic disk valve. You can often tell by the movement of the handle. A cartridge valve usually rotates in a smooth arc, while ball valves have a joystick-like range of motion. Ceramic disk valves are known for their nearly effortless turning. Identifying the brand, such as Moen, Delta, or Kohler, is also vital. Replacement parts are rarely universal. A Moen cartridge will not fit a Delta valve body. Taking a photo of the handle and the trim plate before you start can save you multiple trips to the store and ensure your leaking shower faucet repair goes smoothly from the start.
Diagnosing the Source of the Shower Leak
Finding the exact source of water is the first hurdle in any leaking shower faucet repair. Before you start taking things apart, perform the “Dry Test.” Use a clean towel to thoroughly dry the showerhead, the handle, and the wall around the fixture. Walk away for twenty minutes. When you return, look for the first sign of moisture. If the showerhead is dripping, the internal valve isn’t closing. If water is pooling at the base of the handle, the problem is likely a worn O-ring or a cracked cartridge casing.
Pay attention to the water pattern. A steady, rhythmic drip indicates a failure of the internal seal. Conversely, a fine spray or “misting” that only occurs when the shower is running suggests a high-pressure leak at a connection point or a pinhole in the shower arm. Leaks that only appear when the water is turned on are often more dangerous because they can hide behind the wall for months before showing outward signs. Identifying these patterns early prevents you from replacing parts that are still functional.
Hard Water and Mineral Buildup in Lake County
In Lake County, the high concentration of calcium and magnesium in our water supply creates a hostile environment for plumbing. These minerals often “freeze” shower cartridges in place, making them nearly impossible to remove without specialized tools. Calcification is the accumulation of mineral deposits that eventually prevents plumbing valves from sealing correctly. Even tiny sediment particles can scratch delicate ceramic disk valves, leading to a permanent leak that requires a full component replacement. If your handle feels “crunchy” or difficult to turn, mineral buildup is the likely culprit.
Signs of a Hidden Leak Behind the Wall
Some leaks don’t show up in the shower stall at all. Go to the room sharing a wall with your shower and inspect the baseboards. Look for bubbling paint, damp drywall, or a persistent musty odor. These are classic symptoms of a slow-leak mold growth situation. Sometimes the “riser” pipe, which carries water from the valve up to the showerhead, develops a pinhole leak that only drips when the system is pressurized. If you spot these signs, reaching out for professional leak detection can save your home from extensive structural damage and costly remediation.
DIY vs. Professional Repair: Making the Right Choice
Deciding whether to tackle a leaking shower faucet repair on your own or call in a specialist depends on your tool kit and your tolerance for risk. First, assess your comfort level with your home’s main water supply. If you can’t confidently locate and turn off the main valve, you should not attempt to open the shower valve. A mistake here isn’t just a drip; it’s a flood. You also need to consider the “tool barrier.” Most homeowners have a screwdriver and pliers, but a successful repair often requires a dedicated cartridge puller or a set of deep socket wrenches to reach recessed nuts. Without these, you’re likely to strip the soft brass components or damage the valve body.
If a simple fix goes wrong and you snap a valve stem, you’ve reached the “Point of No Return.” This often transforms a weekend project into an emergency plumbing repair. A professional arrives with the right gear and offers a warranty on their labor, providing peace of mind that a DIY fix simply can’t match. We take pride in our tidy service promise, ensuring that the workspace is left in its original condition after we restore your shower’s function.
When Can You Handle the Repair Yourself?
Minor maintenance tasks are usually safe for a handy homeowner. These projects don’t typically involve the pressurized parts behind the wall. You can likely manage the following:
- Replacing a leaky showerhead or an external O-ring at the swivel joint.
- Cleaning mineral deposits from the fixture using the “baggie method” with white vinegar.
- Updating the handle or the decorative trim kit for aesthetic reasons.
Why Some Repairs Require a Licensed Plumber
More complex issues require the precision and insurance of a professional. Certain scenarios carry a high risk of causing secondary damage to your home’s structure. Consider calling a specialist for:
- Seized valves that won’t budge due to heavy calcification from Central Florida’s hard water.
- Repairs involving polybutylene pipes, which are notoriously fragile and common in older Central Florida homes.
- Replacing the entire valve body located behind the wall, which requires precision cutting and soldering in a confined space.
Our team understands the specific plumbing challenges in Lake County. We treat your property with respect, focusing on reliable results that prevent future headaches.
Step-by-Step Guide to Common Shower Faucet Repairs
Before you pick up a wrench, you must prepare your workspace to ensure a tidy and successful leaking shower faucet repair. Start by shutting off the main water supply to your home. Once the water is off, open the shower handle to drain any remaining pressure. Your next move is vital for your sanity: cover the shower drain with a rag or a piece of tape. This simple step prevents small screws or retaining clips from disappearing into the plumbing. To protect your tub or shower floor from scratches, lay down a heavy towel or drop cloth. This reflects our commitment to a tidy service promise, ensuring your bathroom remains in its original condition throughout the process.
Remove the handle by unscrewing the set screw, which is often hidden behind a small decorative cap. Once the handle is off, you’ll see the escutcheon plate or the “limit stop,” which controls how far the handle can turn toward the hot side. Slide these off to reveal the valve body. Before you pull any parts, take a clear photo of the assembly. This serves as your blueprint for putting everything back together correctly. If you find yourself overwhelmed by the complexity of the valve assembly, our team is always ready to assist with professional fixture installation to ensure your shower functions perfectly.
Replacing a Shower Cartridge (Single Handle)
Modern single-handle faucets usually rely on a plastic or brass cartridge. Look for a small metal retaining clip at the top of the valve body. Use needle-nose pliers to pull this clip straight up, but be careful not to drop it behind the wall. If the cartridge is stuck due to mineral buildup, don’t force it with pliers. A dedicated cartridge puller tool will allow you to extract it without cracking the valve body. Once the old unit is out, wipe the interior of the valve with a clean cloth to remove grit. Apply a thin layer of heat-resistant plumber’s grease to the new O-rings before sliding the new cartridge into place.
Fixing Compression Valves (Two Handles)
Older two-handle systems use compression stems. Use a deep socket wrench to unscrew the packing nut and pull the entire stem assembly out. At the end of the stem, you’ll find a rubber washer held by a brass screw. Replace both the washer and the O-ring on the stem body. Before reassembling, use a flashlight to check the “seat” inside the valve. If the metal looks pitted or uneven, use a seat wrench to replace it. A smooth seat is the only way to get a watertight seal with a new washer.
Testing Your Work
After everything is reassembled, turn the shower handle to the “on” position before restoring the main water. Slowly open the main water valve to avoid a “water hammer” effect, which can damage your pipes. Let the water run for a minute to flush out any dislodged sediment or air. Finally, turn the shower off and check for leaks at both the handle and the showerhead. If the area remains dry, you’ve successfully completed your repair.
Beyond the Drip: Preventing Hidden Water Damage and Mold
While the sound of a steady drip is frustrating, the damage you can’t hear is often far more destructive. A leaking shower faucet repair should never be viewed as a project that can wait until next season. In Central Florida’s high-humidity environment, even a minor internal leak creates the perfect breeding ground for mold within 24 to 48 hours. Because many modern showers are built with tile-over-wood construction, water seeping behind the escutcheon plate often bypasses the waterproof membrane entirely. This leads to saturated wall studs and subfloor rot that can compromise the structural integrity of your bathroom floor before you ever see a puddle.
Preventing these issues starts with managing your home’s water pressure. We often find that premature valve failure is caused by pressure exceeding 80 PSI. This constant strain weakens O-rings and forces water past seals. By maintaining a steady, regulated pressure, you extend the life of your fixtures and avoid the need for a premature repipe. Consistent care is always more affordable than a major restoration.
The High Cost of Ignoring a Small Leak
The math behind a simple drip is startling. A single faucet dripping once per second wastes approximately 3,000 gallons of water every year. Beyond the utility costs, the long-term risk to your property is significant. Many homeowners are surprised to learn that insurance companies frequently deny mold and water damage claims if they determine the leak was “long-term” or “gradual.” They view a leaking shower faucet repair as a basic maintenance responsibility. If a leak is left unaddressed for months, you could be stuck paying for expensive drywall and subfloor remediation out of your own pocket.
Protecting Your Home with Alberto Pro Plumbing
We believe that proactive maintenance is the best way to protect your family’s investment. Our Home Protection Membership provides the consistent, professional oversight needed to catch small drips before they turn into mold-related nightmares. When you choose our professional plumbing service, you’re getting more than just a fix; you’re getting local expertise that understands Clermont’s unique plumbing infrastructure and hard water challenges.
Our “Tidy Service” promise means we treat your home with the same respect we’d show our own. We use protective coverings to ensure your bathroom is left cleaner than we found it. As a family-oriented local specialist, we take pride in providing reliable, neighborly advice that keeps your plumbing system running efficiently year-round. Don’t let a small drip lead to a massive headache; let us handle the messy part so you can enjoy a worry-free home.
Take Control of Your Home’s Plumbing Today
A dripping faucet is more than a nuisance; it’s a signal that your home’s plumbing needs attention. By understanding the source of the drip and the unique challenges posed by Central Florida’s hard water, you can take control of your utility bills and prevent hidden mold growth. Whether you tackle a leaking shower faucet repair yourself or bring in a specialist, the goal is always a dry, safe, and functional bathroom. Identifying the valve type and acting quickly prevents the subfloor rot and insurance complications that often follow long-term leaks.
The messy part of plumbing doesn’t have to be your problem. As a local, family-owned business, we’re here to support you with 24/7 emergency response and our signature tidy service promise. We ensure your workspace is left in its original condition, providing professional results without the stress. Need expert help with a stubborn leak? Contact Alberto Pro Plumbing for fast, tidy service today.
Your home is your biggest investment, and keeping it leak-free is the best way to protect its value. You’ve got the knowledge to move forward, and we’re just a phone call away when you need a helping hand.
Frequently Asked Questions
How do I know if my shower faucet needs a new cartridge?
You’ll know it’s time for a change if the handle becomes difficult to turn or if the water temperature fluctuates unexpectedly. In our region, mineral buildup often causes the internal cartridge to seize or feel gritty. If the drip persists even when the handle is firmly in the off position, the internal seals are likely worn out. Replacing the cartridge is the standard fix for most modern single-handle faucets experiencing these symptoms.
Is a leaking shower faucet considered an emergency?
It depends on the severity of the flow. A slow drip is a maintenance issue, but a steady stream that won’t turn off or water leaking behind the wall is a 24/7 emergency. If you can’t stop the flow by turning the handle, you must shut off the main water valve to prevent flooding. We offer rapid response for these crises across Lake and Orange Counties to protect your home’s structure.
Can hard water cause my shower faucet to leak?
Hard water is a leading cause of fixture failure in Clermont. Dissolved minerals like calcium and magnesium create abrasive scale that wears down rubber washers and scratches the smooth surfaces of ceramic disks. Over time, these deposits prevent the valve from seating correctly. Regular maintenance and water softening can help, but once the internal components are pitted, a professional repair is necessary to restore the watertight seal.
What tools do I need to fix a leaking shower handle?
Most repairs require a mix of basic and specialized tools. You will need a screwdriver to remove the handle, needle-nose pliers for the retaining clip, and an adjustable wrench. For stubborn Central Florida fixtures, a cartridge puller and a deep socket set are essential. Don’t forget heat-resistant plumber’s grease for the new O-rings. Having the right gear prevents you from accidentally stripping the soft brass parts of the valve body.
Why is my shower still dripping after I replaced the washer?
A persistent drip usually means the valve seat is damaged. If the metal seat is pitted or corroded from mineral exposure, a new rubber washer cannot create a watertight seal. You may need to resurface the seat with a dressing tool or replace it entirely using a seat wrench. Occasionally, the leak might actually be coming from a cracked valve body or a faulty riser pipe connection deeper within the wall assembly.
How much water does a leaking shower faucet waste per day?
A typical leak can waste between 20 and 30 gallons of water every day. While a single drip seems small, it adds up to significant waste over a month. This unnecessary usage increases your utility bills and puts extra strain on Central Florida’s limited water supply. Promptly addressing a leaking shower faucet repair is a simple way to practice water conservation while protecting your bathroom from hidden moisture-related damage.
Should I replace my entire shower valve or just the cartridge?
Most leaks are solved by replacing the cartridge, which is much simpler and less invasive. However, if the brass valve body behind the wall is cracked or heavily corroded, the entire unit must be replaced. This usually requires cutting into the drywall from the opposite side of the shower wall. If your valve is an obsolete model with no available replacement parts, a full upgrade to a modern pressure-balancing valve is the best long-term solution.
Can a leaking shower faucet cause mold in my bathroom wall?
Hidden leaks are a primary cause of mold growth in Florida homes. If water seeps behind the decorative wall plate, it can saturate the drywall and wooden studs. Since these areas lack airflow, mold can flourish undetected for months. If you notice a musty smell or see bubbling paint on the wall sharing a border with your shower, it is a sign that a slow leak is already causing structural issues.