
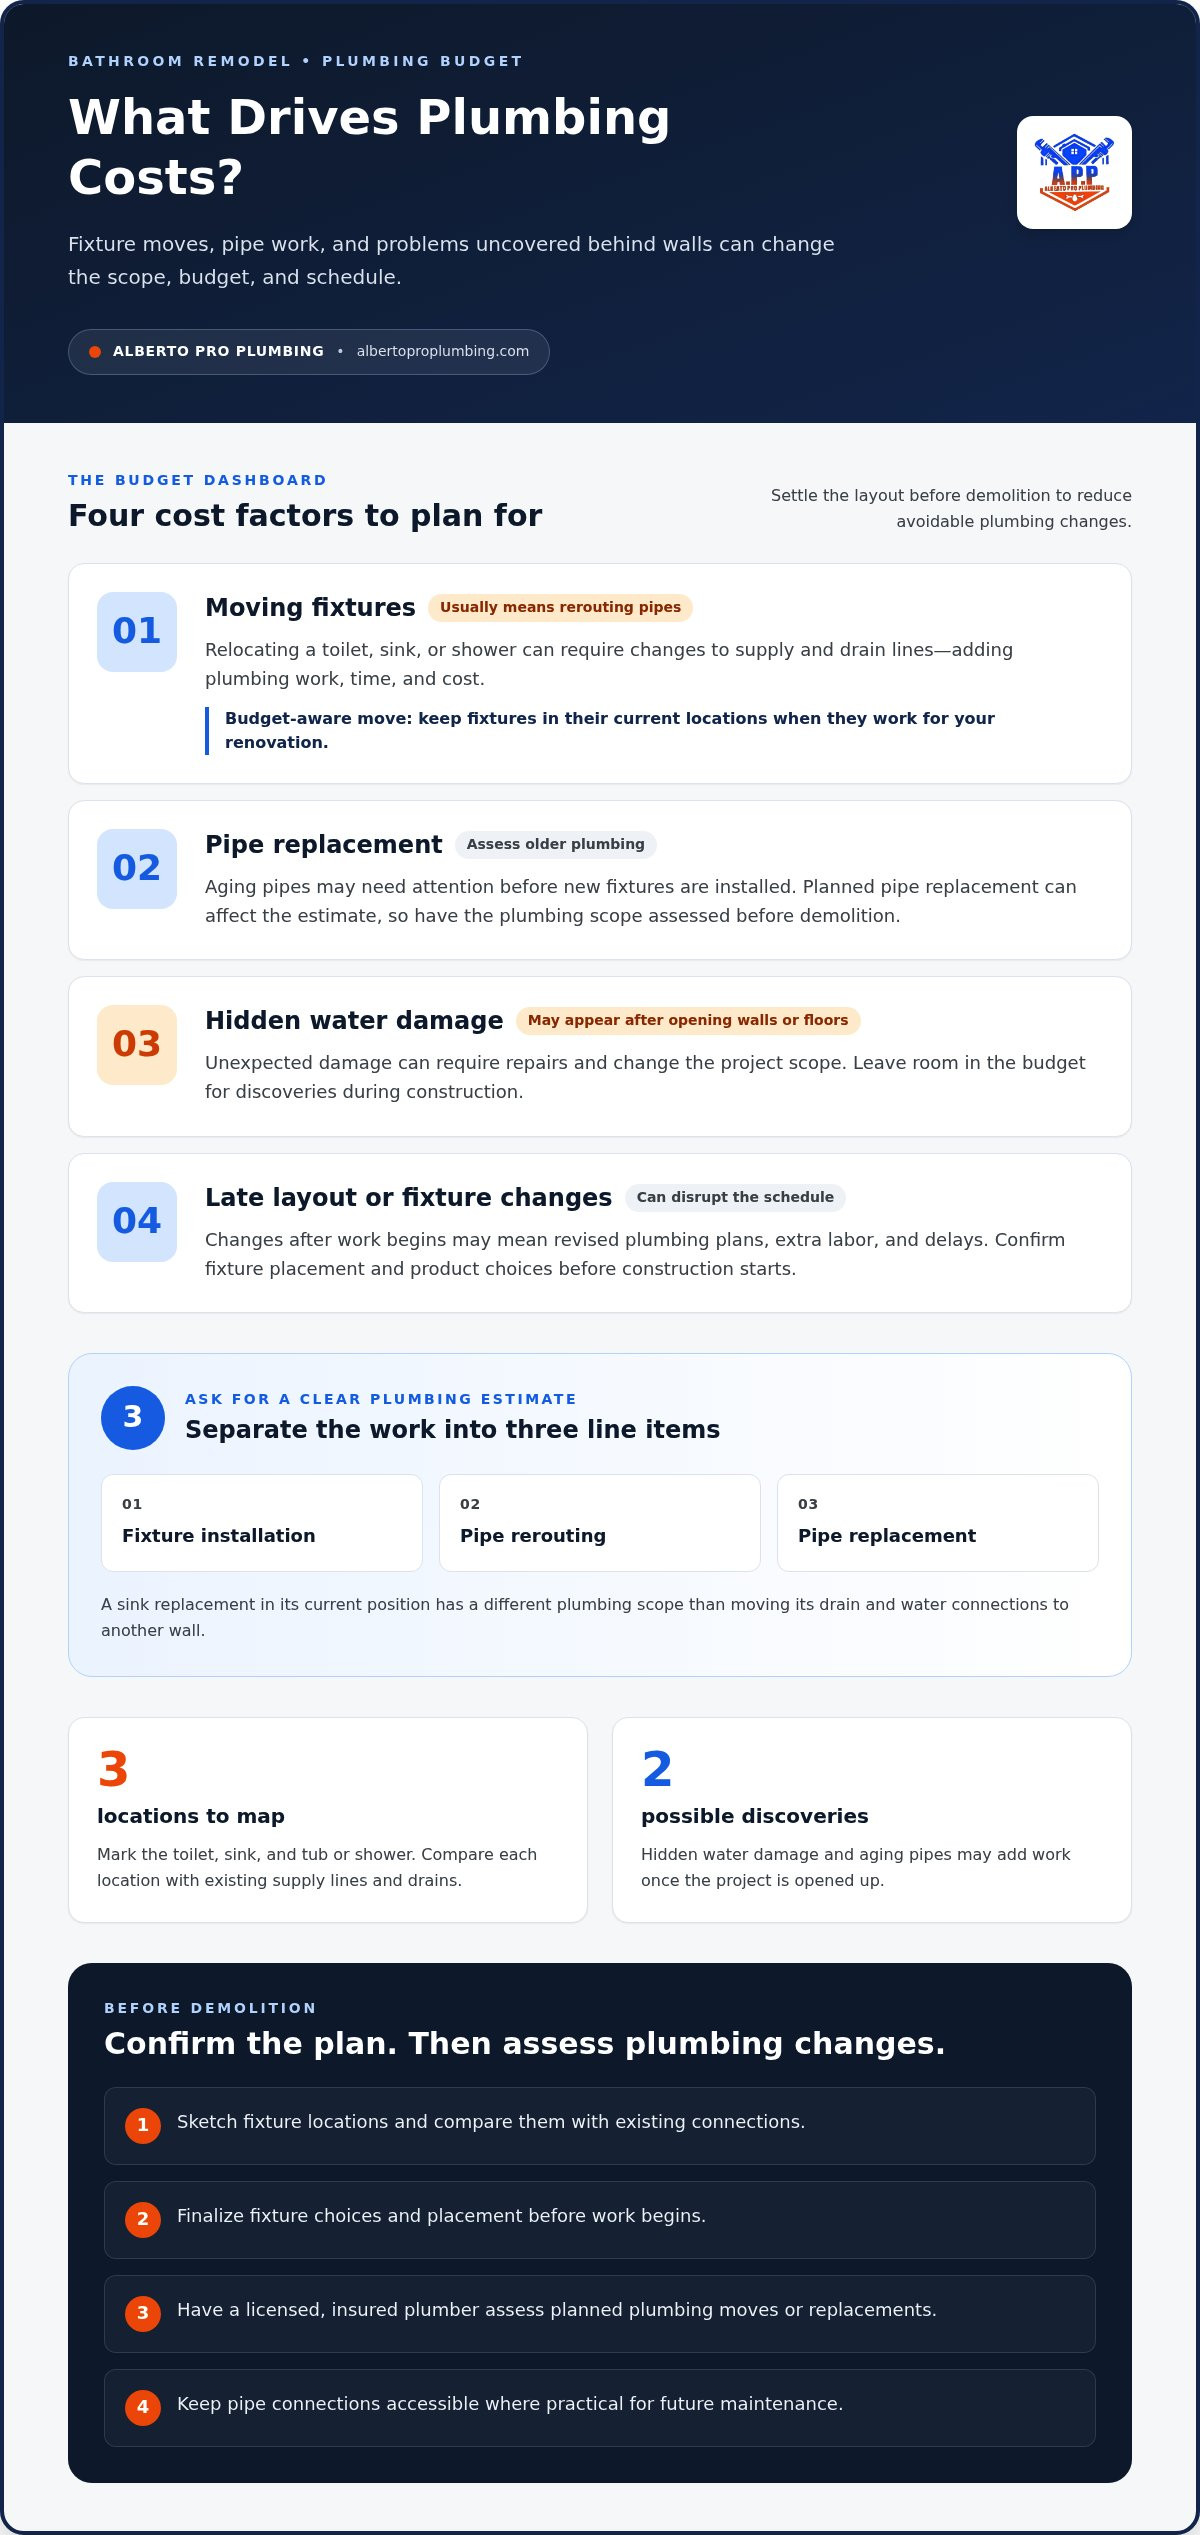
The plumbing cost of a bathroom remodel depends on the work involved. Moving fixtures, replacing pipes, installing new fixtures, and repairing hidden water damage can all affect the budget. Planning a bathroom remodel’s plumbing around existing fixture locations can limit extra work, since moving a toilet, sink, or shower usually means rerouting pipes. Allow room in your budget for unexpected work, and involve a licensed, insured plumber when the project includes moving or replacing plumbing.
It’s natural to focus first on visible choices, such as a tub or shower, but work behind the walls can affect both the budget and schedule. This guide explains how planning a bathroom remodel’s plumbing helps you assess cost factors, choose a tub, shower, or combination, map layout changes, and identify work for a licensed plumber. You’ll also learn how to sequence the project, from confirming fixtures and layout before demolition to allowing for construction delays.
Key Takeaways
- Estimate the budget by identifying the changes that affect plumbing, including fixture moves, pipe replacement, and hidden damage.
- Choose a tub, shower, or combination based on how you use the room and how each option fits the existing layout.
- Plan pipe routes, drainage, and access before demolition to reduce avoidable changes during construction.
- Order and confirm materials before work begins, since missing items and mid-project changes can delay the schedule.
- Bring in a licensed plumber for plumbing moves or replacements, and use Alberto Pro Plumbing’s leak detection, repiping, drain cleaning, or emergency plumbing services when relevant.
How Much Does a Bathroom Remodel Cost?
Common mistakes include moving fixtures before mapping the plumbing and overlooking aging pipes or hidden water damage. Both can add work and disrupt the schedule. Allow a budget cushion and settle the layout before demolition. Planning bathroom plumbing around existing fixture locations can help avoid unnecessary changes.
-
Plan Fixture Locations and Select Fixtures
Sketch the room before choosing fixtures, then mark the toilet, sink, tub, or shower. Compare each placement with the existing supply lines and drains. For example, a larger vanity may fit the wall but require the sink to move. Finalize the layout and fixture choices before work begins. If you are sourcing specialized washroom fittings from manufacturers such as GEC Anderson Limited, reviewing dimensions and connection points early ensures your rough-in plumbing aligns properly. Late changes can mean revised plumbing plans, extra labor, and delays. Planning plumbing alongside fixture selection keeps these decisions connected.
-
Keep Fixtures in Place
Keep the toilet, sink, and shower in their current locations if they work for your renovation. Reusing existing positions can avoid rerouting supply and drain lines, limiting extra plumbing work and schedule changes. You can still update fixtures, finishes, and storage. Plan around the existing connections and preserve access to pipes for future maintenance.
-
Consider Relocating Fixtures and Replacing Pipes
Move a fixture only when its new position improves how you use the room. Relocating a toilet, sink, or shower usually requires rerouting plumbing, adding time and cost. Pipe replacement can also affect the estimate, especially if older plumbing needs attention before new fixtures are installed. Have a licensed, insured plumber assess planned changes before demolition, while pipe routes are easier to discuss.
- Separate the estimate by work. Ask for fixture installation, pipe rerouting, and pipe replacement to be listed separately. This makes it easier to see which design choices affect the plumbing budget. Replacing a sink in its current position, for example, involves a different scope than moving its drain and water connections to another wall.
- Allow for possible discoveries. Set aside a budget cushion for issues uncovered when walls or floors are opened. Hidden water damage may need repairs, while aging pipes may need attention before new fixtures are installed. These conditions can change the scope, so account for them when planning the project.
- Protect the finished plan. Confirm product choices, colors, and fixture placement before construction starts. A clear plan helps coordinate the plumbing with the selected fixtures and reduces the chance of late revisions. Keep pipes accessible where practical, too. Accessible connections are easier to maintain than those sealed behind finished surfaces.
Choosing between a bathtub, shower, or combination
Choose the setup that fits your household, room, and daily routines. Then coordinate the valves, faucets, finishes, and project scope with that decision.
- Match the bathing option to daily use. Choose a bathtub if soaking or bathing children matters to your household. A shower may suit a compact room or a routine centered on quick washing. A tub-and-shower combination provides both options in one footprint. Before settling on a layout, compare each choice with existing plumbing locations, available space, and storage needs.
- Choose a shower valve for temperature control. A pressure-balanced valve adjusts water pressure to regulate temperature. A thermostatic valve maintains a consistent temperature. Consider which control suits how household members use the shower, then include it in the plumbing plan. Choosing early helps coordinate the controls, showerhead, and pipe connections before the walls are closed.
- Check specialty faucet requirements before choosing a sink. Some specialty faucets may need new wiring, filters, or plumbing changes. Their bases may also not fit an existing countertop or sink cutout. Compare the faucet’s installation requirements with the sink and vanity you plan to keep or install. This helps prevent unexpected plumbing or electrical changes prompted by a design choice.
- Set the remodel scope and finishes together. Decide whether the project changes only the bathing area or updates the entire bathroom. Then choose finishes that work with the selected tub, shower, or combination. A shower conversion, for example, may affect wall surfaces, controls, and fixture placement, while replacing a tub may preserve the existing bathing arrangement. Finalize these decisions before construction to avoid mid-project revisions.
- Choose a builder with relevant project experience. Look for experience with the work in your plan, such as replacing a tub, building a shower, or updating plumbing around a custom vanity. Review how the proposed scope handles plumbing and any electrical changes related to specialty fixtures. A clear plan should connect the fixtures and finishes you select with the work needed to install them.
Bathroom layout and plumbing changes
Map the room and plumbing before demolition. Compare fixture positions with windows, lighting, flooring, and drainage so the finished layout works as a whole.
-
Try Multiple Layout Options
Sketch several arrangements before choosing one, and mark the toilet, sink, tub, shower, doors, and windows on each. Compare how people move through the room and whether fixtures block access or natural light. A layout might turn a bathtub 90 degrees to use the space differently. Check whether that change creates practical pipe routes before settling on the design.
-
Plan the Bathroom Layout
Choose the arrangement that balances daily function with the room’s fixed features. Mark where lighting, flooring transitions, storage, and each fixture will go. A large window, for example, can make moving a shower or toilet difficult, so keep its position visible on every sketch. Confirm that the selected layout supports a modern bathroom without creating tight access or awkward movement between fixtures.
-
Plan Pipe Layout and Routing
Trace the existing supply lines and drains to the planned fixtures before demolition. Account for drainage and slope, especially for a shower, where water must flow toward the drain. Don’t choose a shower position based on appearance alone if its drain route won’t work with the floor. Align the pipe plan with the finished flooring and the layout on your drawing.
- Compare the plumbing impact of each sketch. Mark which fixtures stay near existing connections and which need new routes. Moving a toilet, sink, or shower usually means rerouting plumbing, so weigh the practical benefit against the added work. Moving one fixture may be a better option than rearranging the whole room if it improves circulation while keeping other connections close to their current positions.
- Coordinate the water heater location. Include the water heater on the room plan and consider how far it is from the bathroom fixtures. A closer location can reduce the distance hot water travels and associated heat loss. Compare that option with the home’s current setup, and include the chosen location in the plumbing plan rather than treating it as a separate decision. For homeowners managing water heater upgrades alongside room renovations, consulting full-service specialists like Flow Heating, Cooling & Plumbing Services can provide useful guidance on balancing heating performance with efficient plumbing layouts.
- Review the route before opening walls. Put the chosen fixture locations, supply paths, and drain paths on one plan. Review the drawing with the licensed, insured plumber handling the work, and resolve conflicts with windows, lighting, or flooring first. A clear route helps identify layout changes before demolition, while revisions can still be considered without undoing finished surfaces.
Demolition and construction schedule
Build the renovation calendar around materials, plumbing work, and installation order. A typical bathroom remodel takes 4-6 weeks, depending on complexity and material availability.
-
Plan the Bathroom Remodel Schedule
Set a target sequence before demolition, then match each task to its dependencies. Confirm fixture selections, delivery timing, and any plumbing changes before scheduling installation. Special-order bathroom items may take 6-8 weeks or longer to arrive after ordering, so account for that lead time. A calendar that starts demolition before key materials arrive can leave the room unusable while the project waits.
-
Schedule Demolition, Construction, and Installation
Place demolition before behind-the-wall plumbing, then schedule wall and floor work before installing finished fixtures. Tile-based full bathroom remodels commonly take 3 to 6 weeks; the overall duration varies with complexity and material availability. Confirm that every item has arrived, is undamaged, and matches the order before demolition begins. This step can help avoid costly pauses once construction is underway.
- Make a delivery checklist. Compare each fixture, tile, faucet, and finish with the renovation plan when it arrives. Check quantities, dimensions, and visible condition before work starts. A damaged shower fixture discovered after the old one is removed, for example, can interrupt plumbing and installation. Keep the checklist with the schedule so the household and construction team share the same status.
- Allow time for plumbing discoveries. Demolition can reveal hidden water damage or plumbing conditions that change the planned work. Build flexibility into the sequence rather than linking every task to a tight schedule. If pipe repairs are needed, complete them before walls or flooring conceal the routes. This avoids reopening finished surfaces.
- Limit changes after construction begins. Finalize the layout, finishes, and fixtures before demolition, then stick to those choices. A mid-project change can affect product orders, plumbing locations, and the next scheduled trade. Changing a shower fixture after rough plumbing, for instance, may require adjustments before the wall is finished. Decide early to protect the schedule and planned scope.
- Plan for household disruption. Homeowners can often stay at home during a bathroom remodel, but should plan around construction noise and temporary changes to bathroom access. Decide where household members will get ready while the room is unavailable, and keep delivery and work routes clear. Making these arrangements before demolition can make daily routines easier to manage.
Work requiring a separately hired licensed plumber
Bathroom remodel plumbing can include fixture installation, supply and drain changes, pipe replacement, and shutoff valves. Use a licensed, insured plumber when the work involves moving or replacing plumbing, and map those tasks before demolition.
To define the plumbing scope, identify planned fixture moves and pipe changes. Many cities require permits for plumbing work, and a licensed, insured plumber can help plan work that meets applicable code requirements.
-
Identify the Plumbing Work Involved
List every plumbing task in the bathroom plan, from replacing a faucet to moving a toilet. Include new supply lines, drain rerouting, pipe replacement, shower installation, and shutoff valves for individual fixtures. Separate fixture replacements from work behind walls or under floors. This distinction clarifies where plumbing expertise is needed and when the schedule must allow access before finishes go in.
-
Determine Whether to Hire a Plumber Separately
Use a licensed, insured plumber for plumbing that will be moved or replaced, and define the scope before construction begins. Ask for the plan to identify fixture connections, pipe routes, and the order of tasks. Many cities require permits for plumbing work, so include permit requirements in the project plan. This helps avoid closing walls before required plumbing work is complete.
- Prioritize changes behind finished surfaces. Moving a toilet, sink, or shower can involve supply lines, drainage, and access through walls or flooring. Changes like these can increase the scope if the layout shifts after construction starts. Mark each new fixture position on the plan, then match it to the plumbing tasks before demolition. Make the work sequence clear to everyone involved.
- Include shutoff valves in the fixture plan. Plan a shutoff valve for each bathroom fixture to make future maintenance easier. Place the valves where they remain accessible after the vanity, toilet, or shower is installed. A valve hidden behind a fixed cabinet, for example, can be difficult to reach during a repair. Add valve locations to the plumbing drawing, not just the finish plan.
- Separate plumbing from structural changes. Moving a pipe may require access to a wall or floor, while a structural change affects the building itself. Identify both in the remodel scope so plumbing routes don’t conflict with planned construction. Coordinate the sequence before demolition: plumbing work behind new surfaces must be complete before those surfaces are installed.
- Act promptly if demolition reveals a leak. Stop work around an active leak and address the water issue before construction continues. For urgent plumbing problems, request emergency plumbing help. Resolving the leak first can protect exposed framing and keep the remodel plan from advancing over a plumbing problem.
Alberto Pro Plumbing: Emergency Plumbing
Alberto Pro Plumbing can help when a bathroom remodel reveals an active leak or another urgent plumbing problem. Its Emergency Plumbing and Leak Detection services address issues that need attention before construction continues. For aging or failing pipes, Repiping may fit the repair need; Drain Cleaning can help with clogged bathroom drains.
Pause work around an active leak and address its source before closing walls or installing new flooring. For a drain problem, describe where the blockage is and how it affects the bathroom. Clear details help the plumber understand the issue and determine the appropriate next step.
Contact Alberto Pro Plumbing to discuss a bathroom plumbing concern.
Set Up Your Next Step With Confidence
As you plan bathroom remodel plumbing, create a clear handoff for the work ahead. Keep your preferred fixture choices, layout decisions, and known plumbing concerns in one place. Note questions for the plumber, such as a suspected leak or aging pipes. This gives your conversation a practical starting point and connects your decisions to the room you want to create.
Alberto Pro Plumbing can help address plumbing needs that surface during the project. Its Leak Detection service can help locate a suspected leak, Repiping addresses pipe replacement needs, and Emergency Plumbing is available for urgent plumbing issues. Share what you’ve noticed and where it occurs, so the concern can be understood in context.
Take the next step when you’re ready: contact Alberto Pro Plumbing to discuss your bathroom plumbing needs. With a thoughtful plan and the right plumbing support, you can move into the renovation with greater clarity and confidence.
Frequently Asked Questions
Over-bath shower or separate enclosure?
An over-bath shower suits households that need both bathing options in one footprint. A separate enclosure may work better when showering is the priority or the tub is rarely used. Compare how each option affects entry, storage, and usable floor space. Consider who uses the bathroom most and whether stepping over a tub is comfortable for them.
What building regulations do I need to consider?
Check the local requirements that apply to the work, especially if the remodel changes plumbing, electrical, or structural elements. Permit rules and construction requirements depend on the project and local jurisdiction. Before demolition, list the planned changes and discuss them with the local building department or a licensed professional. This helps identify required approvals and distinguish a major alteration from a cosmetic update.
How do you plan bathroom plumbing before demolition?
Start with a scaled sketch showing fixtures, doors, windows, and existing connection points. Add the planned supply and drain routes, then note which walls or floors need access. Photograph visible plumbing and label shutoff locations before demolition. Include the selected fixture specifications, since connection positions can vary between models. Review the drawing before work begins to align plumbing routes with the finished room.
What does it cost to relocate a toilet, shower, or sink?
The cost of moving a fixture depends on its new position, the distance and route for supply and drain lines, pipe condition, and access through walls or flooring. Moving a sink a short distance may involve less rerouting than shifting a toilet across the room. Hidden damage or pipe replacement can add work. Use the planned layout and pipe changes to understand what drives the estimate, rather than considering the fixture price alone.
When does a bathroom remodel require a plumbing permit?
A full remodel that changes plumbing, electrical, or structural elements may require a permit. An update to the wet area within the same footprint may not. Requirements depend on the work and local rules, so describe the scope accurately to the local building department before demolition. Replacing finishes without moving plumbing is different from relocating a drain or changing supply lines.
What plumbing codes apply to bathroom remodels in the United States?
Requirements depend on the local jurisdiction and project scope. For a remodel in Clermont, Florida, identify the local rules for the specific plumbing changes, such as new connections or relocated drains. A licensed, insured plumber can help plan work that meets applicable code requirements. Don’t assume a rule from another city or state applies to your home.
Should you keep bathroom fixtures in their existing locations or move them?
Keep fixtures in place if their current arrangement works for your household and leaves enough room for daily use. Consider moving one only when it solves a real problem, such as poor access to the vanity or an awkward doorway. Compare the improvement with the extra pipe routing and construction involved. A marked floor plan can help show whether a proposed move improves circulation before work starts.
What pipe sizes and drain slopes are required for bathroom plumbing?
The required dimensions depend on the fixture, pipe run, and applicable local requirements. A bathroom sink drain must have a minimum size of 1.25 inches. Drain slope also needs to suit the pipe and route so wastewater flows properly, but the appropriate specification depends on the installation. Show the planned fixture positions and pipe paths to the plumber, who can size and route the system for that layout.